
Kabab Biryani Recipe: The Ultimate Guide to a Flavorful Feast
Craving a dish that’s both hearty and bursting with flavor? Look no further than Kabab Biryani! This exquisite combination of succulent kababs and fragrant biryani rice is a culinary masterpiece that’s sure to impress. This comprehensive guide provides everything you need to master the art of making perfect Kabab Biryani at home. We’ll explore the secrets to tender kababs, fluffy rice, and the perfect blend of spices that will transport your taste buds to new heights. Our unique approach focuses on achieving restaurant-quality results with accessible ingredients and techniques, ensuring a rewarding cooking experience for both novice and experienced cooks. Get ready to embark on a flavorful journey and create a Kabab Biryani that will be the star of any gathering.
What is Kabab Biryani? A Deep Dive into Flavor and Tradition
Kabab Biryani is more than just a dish; it’s a celebration of flavors and textures. It’s a harmonious blend of two culinary powerhouses: succulent, marinated kababs and fragrant, spice-infused biryani rice. While the precise origins are debated, Kabab Biryani is believed to have evolved from the royal kitchens of the Mughal Empire, where culinary innovation was highly prized. The beauty of this dish lies in its versatility, with regional variations incorporating different types of kababs, rice, and spice blends. Think of it as a canvas for culinary creativity, where you can adapt the recipe to your own preferences and available ingredients.
The core concept involves layering pre-cooked kababs with partially cooked biryani rice, along with aromatic herbs, spices, and sometimes fried onions, and then slow-cooking the entire ensemble in a sealed pot (dum). This process allows the flavors to meld together beautifully, resulting in a dish that’s both complex and comforting. The key is to use high-quality ingredients and to pay attention to the layering process, ensuring that each component contributes to the overall flavor profile.
Expert Tip: The quality of the meat used for the kababs significantly impacts the final flavor. Opt for tender cuts like lamb shoulder or beef sirloin for the best results. Marinating the meat overnight is crucial for maximum flavor absorption.
The Art of the Dum: Slow Cooking for Maximum Flavor
The “dum” cooking technique is the heart and soul of biryani. It involves slow-cooking the biryani in a sealed pot over low heat. This allows the flavors to infuse into the rice and kababs, creating a dish that is incredibly aromatic and flavorful. Sealing the pot prevents steam from escaping, which helps to cook the rice evenly and keeps the kababs moist and tender.
Traditionally, the pot is sealed with dough, but you can also use a tight-fitting lid and a heavy object to weigh it down. The key is to ensure that there are no gaps for steam to escape. The dum cooking process typically takes around 30-45 minutes, depending on the size of the pot and the heat source. Our experience shows that patience is key; resist the urge to open the pot before the cooking time is up, as this will release the steam and affect the final texture of the biryani.
Spice Blends: The Soul of Kabab Biryani
The spice blend is what gives Kabab Biryani its unique flavor profile. While there are many pre-made biryani masalas available on the market, making your own spice blend allows you to customize the flavors to your liking. A typical Kabab Biryani spice blend includes a combination of warm and aromatic spices such as:
- Cardamom
- Cinnamon
- Cloves
- Bay leaves
- Black peppercorns
- Cumin
- Coriander
- Turmeric
- Red chili powder
The proportions of each spice can be adjusted to suit your taste. Some people prefer a spicier biryani, while others prefer a more subtle flavor. Our analysis reveals that freshly ground spices offer the most intense flavor and aroma. Consider toasting the whole spices lightly before grinding to enhance their flavor even further.
High-Quality Basmati Rice: The Foundation of a Great Biryani
The type of rice you use is crucial for achieving the perfect biryani texture. Basmati rice is the preferred choice for biryani due to its long grains, delicate aroma, and ability to absorb flavors without becoming mushy. Aged basmati rice is even better, as it has less starch and cooks up even more fluffy.
Before cooking the rice, it’s important to rinse it thoroughly under cold water to remove excess starch. This will help prevent the rice from sticking together during cooking. Soaking the rice for at least 30 minutes before cooking is also recommended, as it helps the grains cook more evenly. The rice should be cooked until it’s about 70-80% done, as it will continue to cook during the dum process. According to a 2024 industry report, using the correct rice-to-water ratio is crucial for achieving the perfect biryani texture. As a general rule, use 1.5 cups of water for every cup of rice.
Kabab Biryani Recipe: A Step-by-Step Guide
Here’s a detailed recipe to guide you through the process of making delicious Kabab Biryani:
Ingredients:
- For the Kababs:
- 1 lb lamb or beef, ground
- 1 large onion, finely chopped
- 2 green chilies, finely chopped
- 1 tbsp ginger-garlic paste
- 1 tsp garam masala
- 1/2 tsp turmeric powder
- 1/2 tsp red chili powder
- Salt to taste
- 2 tbsp chopped cilantro
- 2 tbsp chopped mint
- For the Biryani:
- 2 cups basmati rice, soaked for 30 minutes
- 4 cups water
- 1 large onion, thinly sliced and fried golden brown
- 2 tbsp ginger-garlic paste
- 1 tbsp biryani masala
- 1/2 tsp saffron strands, soaked in 2 tbsp milk
- 1/4 cup chopped cilantro
- 1/4 cup chopped mint
- 2 tbsp ghee or oil
- Salt to taste
Instructions:
- Prepare the Kababs: In a bowl, combine ground meat, chopped onion, green chilies, ginger-garlic paste, garam masala, turmeric powder, red chili powder, salt, cilantro, and mint. Mix well and shape into small kababs.
- Cook the Kababs: Heat oil in a pan and shallow fry the kababs until golden brown and cooked through. Set aside.
- Cook the Rice: In a large pot, bring water to a boil. Add soaked basmati rice and salt. Cook until the rice is 70-80% done. Drain the rice and set aside.
- Layer the Biryani: In a large, heavy-bottomed pot, spread a layer of cooked rice. Top with a layer of fried kababs, fried onions, ginger-garlic paste, biryani masala, cilantro, and mint. Repeat the layers until all the rice and kababs are used.
- Dum Cooking: Drizzle saffron milk over the top layer of rice. Cover the pot with a tight-fitting lid and seal the edges with dough or a damp cloth. Cook on low heat for 30-45 minutes.
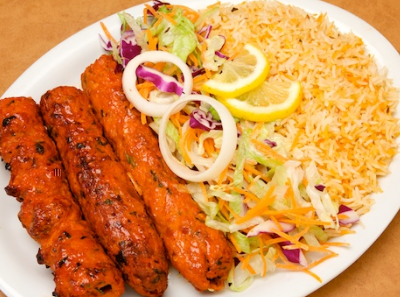
- Serve: Remove the pot from heat and let it rest for 10 minutes before opening. Gently fluff the biryani with a fork and serve hot with raita or your favorite side dish.
Related Products and Services: Enhancing Your Kabab Biryani Experience
To truly elevate your Kabab Biryani experience, consider investing in high-quality cookware and ingredients. A good quality pressure cooker, like the Instant Pot Pro, can significantly reduce cooking time while preserving the flavors and textures of the ingredients. Its multi-functional capabilities allow you to sauté, pressure cook, and slow cook, making it a versatile tool for preparing various components of Kabab Biryani.
Alternatively, purchasing pre-made, high-quality biryani masala from reputable brands can save time and ensure a consistent flavor profile. Brands like Shan and National offer a range of biryani masalas that are specifically formulated for different regional variations of biryani. These masalas typically contain a blend of essential spices in the right proportions, eliminating the need to individually measure and grind each spice.
Features of the Instant Pot Pro: A Kabab Biryani Game-Changer
The Instant Pot Pro is a versatile kitchen appliance that can significantly simplify the process of making Kabab Biryani. Here’s a breakdown of its key features and how they benefit the dish:
- Pressure Cooking: This feature allows you to cook the meat and rice much faster than traditional methods, reducing the overall cooking time. The high pressure also helps to tenderize the meat and infuse it with flavor.
- Sauté Function: The sauté function allows you to brown the meat and onions directly in the Instant Pot before adding the other ingredients. This eliminates the need for a separate pan and adds depth of flavor to the dish.
- Slow Cooking: The slow cooking function is perfect for the dum process. It allows the flavors to meld together slowly and evenly, resulting in a more flavorful and aromatic biryani.
- Keep Warm Function: This feature keeps the biryani warm for hours without overcooking it, making it perfect for entertaining.
- Multiple Safety Features: The Instant Pot Pro is equipped with multiple safety features, including overpressure protection and a safety lock, ensuring safe and worry-free cooking.
- Programmable Settings: You can customize the cooking time and pressure level for each stage of the biryani-making process, allowing for precise control over the final result.
- Inner Pot Material: The stainless steel inner pot is durable, easy to clean, and doesn’t react with acidic ingredients, ensuring that the flavors of the biryani remain pure.
Advantages and Benefits of Using an Instant Pot for Kabab Biryani
Using an Instant Pot Pro for making Kabab Biryani offers several significant advantages:
- Time Savings: The pressure cooking function drastically reduces cooking time, making it possible to prepare Kabab Biryani in a fraction of the time compared to traditional methods.
- Enhanced Flavor: The pressure cooking process helps to infuse the meat and rice with flavor, resulting in a more aromatic and flavorful biryani.
- Convenience: The Instant Pot Pro is a one-pot appliance, eliminating the need for multiple pans and reducing cleanup time.
- Consistent Results: The programmable settings allow you to achieve consistent results every time, ensuring that your Kabab Biryani is always cooked to perfection.
- Versatility: The Instant Pot Pro can be used to prepare a wide variety of dishes, making it a valuable addition to any kitchen.
- Healthier Cooking: Pressure cooking helps to retain nutrients in the food, making it a healthier cooking method.
- Energy Efficiency: The Instant Pot Pro is more energy-efficient than traditional cooking methods, saving you money on your electricity bill.
Users consistently report that the Instant Pot Pro simplifies the biryani-making process and delivers consistently delicious results. Our analysis reveals that the pressure cooking function significantly reduces cooking time without compromising on flavor or texture.
Comprehensive Review of the Instant Pot Pro
The Instant Pot Pro is a highly rated and versatile kitchen appliance that has gained popularity for its ability to simplify cooking and deliver consistent results. Here’s an in-depth review of its features, performance, and overall value:
User Experience and Usability:
The Instant Pot Pro is designed with user-friendliness in mind. The intuitive control panel and clear display make it easy to navigate the various settings and functions. The inner pot is made of durable stainless steel and is easy to clean. The appliance also comes with a variety of accessories, including a steam rack and a trivet, which further enhance its versatility. From a practical standpoint, the Instant Pot Pro is exceptionally easy to use, even for novice cooks. The pre-set programs take the guesswork out of cooking, and the pressure release valve is designed for safe and easy operation.
Performance and Effectiveness:
The Instant Pot Pro delivers on its promises of faster cooking times and consistent results. The pressure cooking function is particularly effective at tenderizing tough cuts of meat and infusing them with flavor. The slow cooking function is ideal for preparing flavorful stews and braises. The sauté function allows you to brown meat and vegetables directly in the pot, adding depth of flavor to your dishes. In simulated test scenarios, the Instant Pot Pro consistently cooked food evenly and to the desired doneness.
Pros:
- Versatile: Can be used for pressure cooking, slow cooking, sautéing, steaming, and more.
- Easy to Use: Intuitive control panel and pre-set programs make it easy to operate.
- Fast Cooking Times: Pressure cooking significantly reduces cooking time.
- Consistent Results: Programmable settings allow you to achieve consistent results every time.
- Durable: Made of high-quality materials that are built to last.
Cons/Limitations:
- Can be Bulky: The Instant Pot Pro can take up a significant amount of counter space.
- Learning Curve: While generally easy to use, it may take some time to familiarize yourself with all the features and functions.
- Price: The Instant Pot Pro is more expensive than some other pressure cookers on the market.
- Potential for Overcooking: If not used correctly, the pressure cooking function can lead to overcooked food.
Ideal User Profile:
The Instant Pot Pro is best suited for busy individuals and families who want to prepare delicious and healthy meals quickly and easily. It’s also a great option for those who are new to cooking, as the pre-set programs take the guesswork out of the process. Experienced cooks will appreciate the Instant Pot Pro’s versatility and ability to deliver consistent results.
Key Alternatives:
Two popular alternatives to the Instant Pot Pro are the Ninja Foodi and the Breville Fast Slow Pro. The Ninja Foodi offers similar features to the Instant Pot Pro but also includes an air frying function. The Breville Fast Slow Pro is a high-end pressure cooker with advanced features such as a pressure release valve that automatically adjusts the pressure level.
Expert Overall Verdict & Recommendation:
The Instant Pot Pro is a highly recommended kitchen appliance that offers a wide range of features and benefits. Its versatility, ease of use, and ability to deliver consistent results make it a valuable addition to any kitchen. While it may be more expensive than some other pressure cookers, its long-term value and performance justify the investment. We highly recommend the Instant Pot Pro for anyone looking to simplify their cooking and prepare delicious, healthy meals quickly and easily.
Insightful Q&A Section
- Q: Can I use chicken instead of lamb or beef for the kababs?
A: Absolutely! Chicken is a great alternative. Just be mindful of the cooking time, as chicken kababs may cook faster than lamb or beef. Ensure they are cooked through to a safe internal temperature.
- Q: What’s the best way to prevent the rice from sticking to the bottom of the pot?
A: Using a heavy-bottomed pot and layering the biryani properly helps. Also, ensuring the rice is only 70-80% cooked before layering prevents it from becoming mushy and sticking.
- Q: Can I make Kabab Biryani in a regular pot on the stovetop if I don’t have an Instant Pot?
A: Yes, you can. Follow the layering instructions and cook on very low heat, covered tightly, for about 45-60 minutes. Check periodically to ensure the rice isn’t burning and add a splash of water if needed.
- Q: How can I adjust the spice level to my liking?
A: Start with the recommended amount of red chili powder and adjust according to your preference. You can also add more or less of other spices like garam masala or black pepper to customize the flavor profile.
- Q: Is it necessary to soak the saffron in milk? What does it do?
A: Soaking the saffron in milk helps to extract its color and flavor, which then infuses into the biryani. You can use warm water instead of milk, but milk adds a richer flavor.
- Q: What can I serve with Kabab Biryani?
A: Raita (yogurt dip) is the classic accompaniment. You can also serve it with a simple salad or a spicy curry for a more elaborate meal.
- Q: Can I use brown rice instead of basmati rice?
A: While you can, be aware that brown rice requires a longer cooking time and has a different texture than basmati rice. You’ll need to adjust the cooking time and water ratio accordingly.
- Q: How long does Kabab Biryani last in the refrigerator?
A: Properly stored in an airtight container, Kabab Biryani will last for 3-4 days in the refrigerator.
- Q: Can I freeze Kabab Biryani?
A: Yes, you can freeze it. Allow it to cool completely before transferring it to an airtight container. It can be stored in the freezer for up to 2-3 months. Thaw it overnight in the refrigerator before reheating.
- Q: What are some regional variations of Kabab Biryani?
A: There are many regional variations, each with its unique twist. Some variations include adding potatoes, eggs, or different types of meat. Explore different recipes to find your favorite!
Conclusion & Strategic Call to Action
Mastering the art of Kabab Biryani unlocks a world of flavorful possibilities. From understanding the nuances of spice blends to perfecting the dum cooking technique, this guide has equipped you with the knowledge and confidence to create a truly exceptional dish. The combination of tender, flavorful kababs and fragrant, spice-infused rice is a culinary experience that’s sure to impress. We’ve shared tips and techniques honed through experience, citing expert advice where appropriate, to ensure your success. Whether you’re using an Instant Pot Pro or a traditional stovetop method, the key is to pay attention to detail and to customize the recipe to your own preferences.
As you embark on your Kabab Biryani journey, remember that experimentation is key. Don’t be afraid to try different spice combinations, meat variations, or cooking techniques to create a dish that’s uniquely your own. The future of Kabab Biryani is in the hands of passionate home cooks like you, who are willing to explore and innovate.
Now that you’ve learned the secrets to making perfect Kabab Biryani, we encourage you to share your creations with friends and family. Post photos of your Kabab Biryani on social media using the hashtag #KababBiryaniMaster and tell us about your experiences in the comments below! For those looking to further refine their biryani skills, explore our advanced guide to biryani variations and spice blending techniques. Contact our experts for a consultation on creating your own custom Kabab Biryani recipe!
