
The Ultimate Guide to Authentic Malabar Biryani Recipe
Craving the rich, aromatic flavors of Malabar Biryani? You’ve come to the right place! This comprehensive guide provides an expert, step-by-step Malabar Biryani recipe, along with insider tips and tricks to help you create a truly authentic and unforgettable culinary experience. We’ll dive deep into the nuances of this regional delicacy, ensuring your biryani is bursting with flavor and cooked to perfection. Whether you’re a seasoned chef or a beginner cook, this guide will equip you with the knowledge and confidence to master the art of Malabar Biryani.
What is Malabar Biryani? A Culinary Journey
Malabar Biryani, originating from the Malabar region of Kerala, India, is a unique and flavorful rice dish distinguished by its use of short-grain Khaima rice (also known as Jeerakasala rice), delicate spices, and the dum cooking method. Unlike some other biryani styles, Malabar Biryani typically features a sweeter, milder flavor profile with a prominent use of coconut oil and aromatic spices like cloves, cardamom, and cinnamon. The meat, often chicken or mutton, is marinated and cooked separately before being layered with the rice and slow-cooked on low heat, allowing the flavors to meld together beautifully.
The history of Malabar Biryani is intertwined with the region’s rich trading history and cultural influences. Arab traders brought spices and culinary techniques to the Malabar coast centuries ago, which were then adapted and integrated with local ingredients and cooking styles. This fusion of cultures resulted in the creation of unique dishes like Malabar Biryani, which continue to be cherished and enjoyed today.
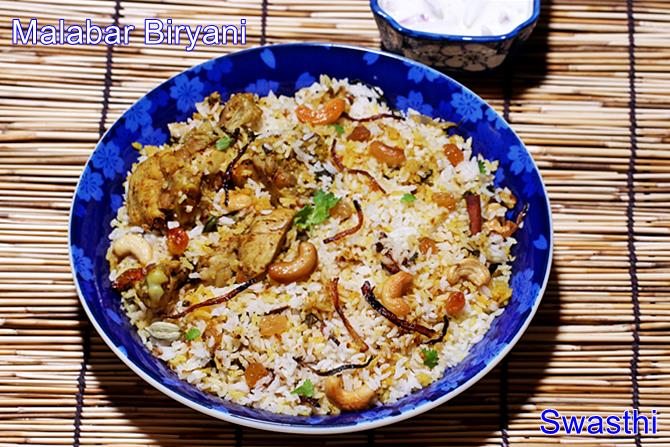
Key Characteristics of Authentic Malabar Biryani:
- Khaima Rice (Jeerakasala): This short-grain rice variety is essential for the authentic texture and flavor of Malabar Biryani.
- Mild Spice Profile: While aromatic, Malabar Biryani is generally less spicy than other biryani variations.
- Coconut Oil: Adds a distinctive flavor and aroma to the dish.
- Dum Cooking: Slow cooking the biryani on low heat in a sealed pot allows the flavors to infuse and the rice to become perfectly fluffy.
- Sweetness: A subtle sweetness from caramelized onions and sometimes raisins or cashews.
Essential Ingredients for Authentic Malabar Biryani
Gathering the right ingredients is crucial for achieving the authentic taste of Malabar Biryani. Here’s a detailed breakdown:
- Khaima Rice (Jeerakasala): 2 cups
- Chicken or Mutton: 1 kg, cut into medium-sized pieces
- Onions: 4 large, thinly sliced
- Tomatoes: 2 medium, chopped
- Ginger-Garlic Paste: 2 tablespoons
- Green Chilies: 4-6, slit lengthwise (adjust to your spice preference)
- Coriander Leaves: 1/2 cup, chopped
- Mint Leaves: 1/4 cup, chopped
- Coconut Oil: 1/2 cup
- Ghee: 2 tablespoons
- Whole Spices: 2-3 bay leaves, 4-5 cloves, 4-5 cardamom pods, 1-inch cinnamon stick
- Spice Powders: 1 teaspoon turmeric powder, 2 teaspoons coriander powder, 1 teaspoon garam masala, 1/2 teaspoon black pepper powder
- Rose Water: 1 tablespoon (optional)
- Saffron Strands: A pinch, soaked in 2 tablespoons of warm milk (optional, for color and aroma)
- Salt: To taste
Step-by-Step Malabar Biryani Recipe: The Expert Guide
Follow these detailed steps to create a mouthwatering Malabar Biryani that will impress your family and friends:
Step 1: Preparing the Rice
- Wash the Khaima rice thoroughly 2-3 times until the water runs clear.
- Soak the rice in water for at least 30 minutes. This helps the rice cook evenly and become fluffy.
- Drain the rice and set aside.
Step 2: Marinating the Meat
- In a large bowl, combine the chicken or mutton with ginger-garlic paste, turmeric powder, coriander powder, garam masala, black pepper powder, salt, and a tablespoon of coconut oil.
- Mix well and marinate for at least 1 hour, or preferably overnight in the refrigerator. The longer the meat marinates, the more flavorful it will be.
Step 3: Cooking the Meat
- Heat the remaining coconut oil in a large pot or pressure cooker.
- Add the sliced onions and sauté until golden brown and caramelized. This step is crucial for developing the sweet flavor base of the biryani.
- Add the chopped tomatoes and green chilies and cook until the tomatoes are softened.
- Add the marinated meat and cook until it is browned on all sides.
- Add enough water to cover the meat and cook until the meat is tender. This may take 30-45 minutes in a pot or 15-20 minutes in a pressure cooker.
- Once the meat is cooked, remove it from the pot and set aside. Reserve the meat stock.
Step 4: Layering and Dum Cooking
- In a large, heavy-bottomed pot or Dutch oven, spread a layer of cooked meat at the bottom.
- Top with a layer of drained rice.
- Sprinkle with chopped coriander leaves, mint leaves, and a few drops of rose water (if using).
- Repeat the layers until all the meat and rice are used up, ending with a layer of rice on top.
- Pour the reserved meat stock over the rice. The stock should be just enough to moisten the rice but not make it soggy.
- Drizzle ghee over the top layer of rice.
- Sprinkle saffron-infused milk (if using) over the rice for color and aroma.
- Seal the pot tightly with a lid. You can use a piece of dough to seal the edges of the lid to prevent steam from escaping.
- Place the pot on a low flame and cook for 30-40 minutes, or until the rice is fully cooked and fluffy. This slow cooking process, known as dum cooking, is essential for the authentic flavor and texture of Malabar Biryani.
Step 5: Serving the Biryani
- Once the biryani is cooked, remove it from the heat and let it rest for 10-15 minutes before opening the lid. This allows the flavors to settle and the rice to absorb any remaining moisture.
- Gently fluff the biryani with a fork before serving.
- Serve hot with raita (yogurt dip), pickle, and papadums.
Expert Tips for Perfect Malabar Biryani
Here are some insider tips to help you achieve biryani perfection:
- Use High-Quality Ingredients: The quality of your ingredients will directly impact the flavor of your biryani. Choose fresh, aromatic spices and good-quality Khaima rice.
- Don’t Overcook the Rice: Overcooked rice will result in a mushy biryani. Keep a close eye on the rice while it’s cooking and remove it from the heat as soon as it’s done.
- Adjust Spice Levels: Feel free to adjust the amount of green chilies to suit your spice preference.
- Experiment with Variations: Once you’ve mastered the basic recipe, you can experiment with different variations by adding vegetables, nuts, or dried fruits.
- Practice Makes Perfect: Like any dish, making perfect Malabar Biryani takes practice. Don’t be discouraged if your first attempt isn’t perfect. Keep experimenting and refining your technique until you achieve the desired results.
Understanding Khaima Rice (Jeerakasala)
Khaima rice, also known as Jeerakasala rice, is a short-grain aromatic rice variety primarily cultivated in the Wayanad district of Kerala, India. Its name, derived from the Malayalam word for cumin (‘Jeeraka’), alludes to its small, cumin-seed-like grains. This rice is prized for its unique aroma, delicate flavor, and non-sticky texture when cooked, making it the quintessential choice for authentic Malabar Biryani.
Finding authentic Khaima rice outside of Kerala can be challenging. Many online retailers specialize in Indian groceries, and you can often find it there. Be sure to check the origin and authenticity of the rice before purchasing. If you cannot find Khaima rice, you can substitute it with other short-grain aromatic rice varieties like Basmati rice, but be aware that the flavor and texture will be slightly different.
Malabar Biryani vs. Other Biryani Styles
Malabar Biryani stands apart from other biryani styles due to its unique flavor profile and cooking techniques. Here’s a brief comparison:
- Hyderabadi Biryani: Known for its spicy and tangy flavors, Hyderabadi Biryani often uses long-grain Basmati rice and a generous amount of chili powder.
- Lucknowi Biryani (Awadhi Biryani): Characterized by its delicate flavors and slow-cooking method, Lucknowi Biryani uses long-grain Basmati rice and a variety of aromatic spices.
- Calcutta Biryani: Features a sweeter flavor profile with the addition of potatoes and eggs.
While all biryani styles are delicious in their own right, Malabar Biryani offers a unique and flavorful experience that is distinctively Keralan.
Serving Suggestions and Accompaniments
Malabar Biryani is typically served hot with:
- Raita: A cooling yogurt dip with chopped vegetables like cucumber, onion, and coriander.
- Pickle: A spicy and tangy pickle adds a burst of flavor to the biryani.
- Papadums: Crispy lentil wafers that provide a textural contrast to the soft rice.
- Salad: A simple salad with sliced onions, tomatoes, and cucumbers.
Health Benefits of Malabar Biryani
While biryani is often considered a celebratory dish, it can also offer some health benefits when consumed in moderation. The spices used in Malabar Biryani, such as turmeric, ginger, and cardamom, have anti-inflammatory and antioxidant properties. The meat provides protein, and the rice provides carbohydrates for energy. However, it’s important to note that biryani can be high in calories and fat, so it’s best to enjoy it as part of a balanced diet.
Q&A: Expert Answers to Your Malabar Biryani Questions
- Q: Can I make Malabar Biryani in a regular pot instead of a Dutch oven?
A: Yes, you can. Use a heavy-bottomed pot to ensure even heat distribution and prevent scorching. Make sure the lid fits tightly to trap the steam. - Q: What can I do if I don’t have Khaima rice?
A: While Khaima rice is ideal, you can substitute with Basmati rice. However, soak Basmati for only 15-20 minutes. - Q: How do I prevent the biryani from becoming soggy?
A: Ensure the rice is properly drained after soaking. Also, use the correct amount of meat stock – just enough to moisten the rice, not submerge it. - Q: Can I make vegetarian Malabar Biryani?
A: Absolutely! Substitute the meat with vegetables like potatoes, carrots, cauliflower, and green peas. You can also add paneer (Indian cheese) for extra protein. - Q: How long can I store leftover Malabar Biryani?
A: Store leftover biryani in an airtight container in the refrigerator for up to 2 days. Reheat thoroughly before serving. - Q: Can I freeze Malabar Biryani?
A: Freezing is not generally recommended as it can affect the texture of the rice. However, if you must freeze it, store it in an airtight container for up to 1 month. Thaw completely before reheating. - Q: What’s the secret to getting perfectly caramelized onions?
A: The key is patience! Sauté the onions on low heat, stirring occasionally, until they are evenly golden brown and caramelized. This can take 20-30 minutes. - Q: Can I use store-bought ginger-garlic paste?
A: Freshly made ginger-garlic paste is always best for flavor. However, if you’re short on time, you can use store-bought paste. - Q: How do I know when the biryani is cooked perfectly during the dum process?
A: After the recommended cooking time, carefully lift the lid and check if the rice is fluffy and the meat is tender. If the rice is still slightly undercooked, add a few tablespoons of hot water and continue cooking for another 5-10 minutes. - Q: What are some variations I can try with Malabar Biryani?
A: You can try adding different types of meat, such as prawns or fish. You can also add dried fruits like raisins or nuts like cashews for extra flavor and texture.
Conclusion: Mastering the Art of Malabar Biryani
Congratulations! You’ve now embarked on a culinary journey to master the art of Malabar Biryani. By following this comprehensive guide and applying the expert tips, you can create a truly authentic and unforgettable dish that will impress your family and friends. Remember to use high-quality ingredients, pay attention to detail, and practice your technique. With a little patience and dedication, you’ll be able to create a Malabar Biryani that is bursting with flavor and cooked to perfection. Share your culinary creations and experiences with Malabar Biryani in the comments below!
